Double Chocolate Mug Cake- Eggless!

With Valentine’s day being around the corner, all of us want to do something special for the ‘special one’. With busy schedules and hectic work, it gets so difficult to take time off and make something for our loved ones. My husband loves cakes and I wanted to bake a dozen cupcakes for him, but alas I just couldn’t fit it around my work schedule. So I decided to make something a little different yet yummmmy to show that I honestly tried ๐Ÿ˜‰ Hahaha.

So here is a quick recipe of the double chocolate cake I made in a coffee mug. Real quick, very simple and trust me it’s truly yummmy and guess what- ITS EGGLESS!! I got inspired to bake this when I came across a similar recipe in a blog I read a few days back. Thanks to her, I should say that I totally nailed this one! (http://www.tablefortwoblog.com)

Double Chocolate Coffee Mug Cake

So lets get started:

Ingredients:

  • 1/4 cup All purpose flour
  • Pinch of salt
  • 1/4 tsp Baking powder
  • 2.5 tbsp sugar
  • 2 tbsp unsweetened cocoa powder
  • 1/4 cup milk
  • 2 tbsp oil
  • 1 tbsp cookie and cocoa swirl (or any spread you like – peanut butter, chocolate or hazelnut spread etc)

IMG_2109

Method:

  • Mix all the dry ingredients in a bowl.

IMG_2110

  • Add milk and oil and whisk it well to break all lumps.

IMG_2136

  • Pour the batter in a microwave safeย coffee mug.

IMG_2116

  • Add 1 tbsp of your favorite spread on top of the batter.
  • IMG_2127
  • Microwave it for 65-70 seconds on high temperature.
  • Enjoy the yummmy cake with your loved ones.
  • Allow it to cool and alternatively you can top it with vanilla ice-cream/whipped cream and decorate with sprinkles or any other decoration of your choice.

IMG_2133 IMG_2134

IMG_2135

Happppy cooking!

Spreading Love ๐Ÿ™‚

Adios!

Valentine’s Day Makeup Tutorial!

Hey Ladies,

Wanna look your best this valentine’s day?

May be this quick and easy tutorial can help!! ๐Ÿ™‚

Spreading LOVE ๐Ÿ™‚

Like/Comment/Subscribe if you enjoyed this post!!

Coachella Inspired Festival Make-up look

Are you all ready for Coachella this year???

Watch this amazing Coachella inspired look to look fab this music season ๐Ÿ™‚

Don’t forget to like, comment or subscribe if you enjoyed this post !

Adios ๐Ÿ™‚

Handmade cards #2!

Baby Shower & Miss you Handmade Card!!

cards1

Crafting has not only been a hobby, but a true passion. It started from making personalized gifts for friends which is not only memorable, but it gives you an immense measure of self-satisfaction ๐Ÿ™‚

These are 2 cards I made for 2 of my friends here at the International communityย – One who is going to be expecting a Baby Boy soon!! Yay ๐Ÿ™‚

The second is for a friend who is going back home and who we all will dearly miss!!

*Mixed emotions*

Materials Used:

  • Patterned Card stock
  • Ribbon
  • Pearl and crystal embellishments
  • Sentiments ( I printed it out using a normal Inkjet printer)
  • Paper Doilies

2


3

Happpy crafting ๐Ÿ™‚

Eggless Pineapple Cake

Who doesn’t like cakes and especially if it is homemade with love and tastes sinful ๐Ÿ™‚

This eggless version of pineapple cake is a must try and no failure recipe. I am currently teaching an Eggless Baking Class at the Stanford International Center and I must admit that this has been one of the most cherished experiences ever. Thanks to the ladies for letting me take pictures during the class.

3Ingredients:

  • All purpose flour (or) Cake flour โ€“ 2 cups
  • Baking powder โ€“ 2 tsp
  • Baking soda โ€“ 1 tsp
  • Salted butter โ€“ ยฝ cup
  • Sugar โ€“ ยพ cup
  • Pineapple extract โ€“ 1.5 tsp
  • Milk โ€“ 3 tablespoons (as per consistency)
  • Curd โ€“ ยฝ cup
  • Oil โ€“ ยฝ cup
  • Apple sauce (unsweetened) โ€“ ยฝ cup
  • Tinned pineapple slices

Frosting :

  • 2 cups heavy whipping cream
  • Sugar (as per taste)

Method:

  • Firstly, sift all the dry ingredients โ€“ the flour, baking powder and baking soda and keep aside.
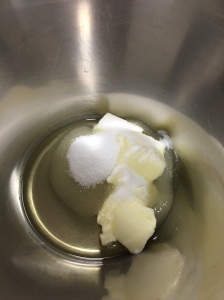
  • Cut the butter into cubes and place in the mixing bowl. Add sugar & cream it till soft and fluffy.

IMG_1887

  • Add pineapple extract, apple sauce and curd and whisk well until everything is incorporated well. Add oil to the batter and mix again.

IMG_1889

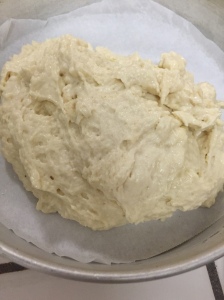
  • Next add the dry ingredients mix a little by little and remember not to over-beat the batter at this stage
  • Add milk till you get a good consistency of the batter. Nor to , neither too stiff.

IMG_1890

  • Pre-heat the over at 180 degree celsius or 350 F.
  • Transfer the batter into the cake mould and bake for 20 mins.
  • Do the knife/toothpick test to check if the cake has been cooked properly.

IMG_1891IMG_1892


Frosting:

  • Place the beater blades and the bowl your going to whip the cream in, inside the fridge for at least 30 mins. Thisย fastens the whipping process.
  • Add cream and sugar, whip till it forms soft peaks and does not pour over when you turn the bowl.FullSizeRender

Assembling the cake:

  • Divide the cake into 2 and gently pour a little pineapple water (from the tin) on the halved cake.
  • Places pineapple pieces randomly around the halved cake and then generously coat it with the cream.
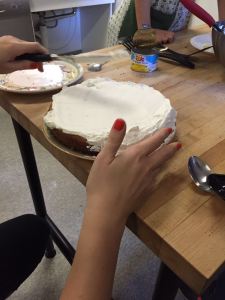
  • Place the other halved cake over this and spread the cream all over on the top and sides.

IMG_1917

  • Decorate with pineapple and raspberry/strawberry and serve chilled ๐Ÿ™‚

3


P.S :ย A few of the pictures below are from the class. I’m sure the ladies will approve it. Haha ๐Ÿ™‚

Happy Baking!

Adios ๐Ÿ™‚

Beauty Tip Guru – Uses of Coconut Oil

Hey Beauties,

This is a short video onย different tips, tricks and uses of COCONUT OIL..

Watch this video and see the magical uses of Coconut oil Yes, believe me when I say this- Not 1,2,3..but 20 different ways you can make use of this magical and inexpensive method to look beautiful & glowing ๐Ÿ™‚

Don’t forget to follow, like or comment if you enjoyed this post!

Adios ๐Ÿ™‚

Customized Etched Glasses

Hi all,

As you all know, craft is my first love and Pinterest is my best friend.

DIY ideas in Pinterest in a must check out, incase none of you have come across it. I recently saw a pin on making Customized Etched glass tutorial and immediately decided to pin it and obviously make it ๐Ÿ˜‰ Haha.They can make such good wedding gifts or simple give-aways that look classy yet affordable.

You wonโ€™t believe how simple it is to make this adorable project. You can etch absolutely anything like wine glass, mason jars (eg. make customized sugar, salt, coffee jars. What say?)- just that it has to be GLASS and not any other material.

eal2

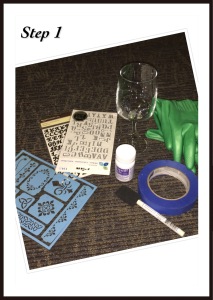
So letโ€™s gather the materials we will need.

Materials:

  • Wine glasses from Dollar Store
  • Armour Etch Cream
  • Gloves
  • Foam brush or Popsicle Stick
  • Masking or Painterโ€™s tape
  • Sticker letters or re-useable stencils or Vinyl Stickers

eal2

eal1 Steps :

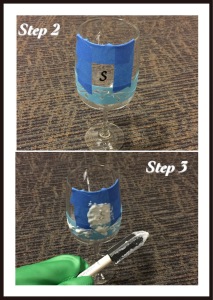
  1. Adhere the stencils and letters as per your choice onto a clean glass surface.
  2. Apply a masking tape all around in order to avoid the etching cream to spread and you sure don’t want to ruin your art work.
  3. Wear gloves ( very important) and generously apply a nice coat of the etching cream over the stencil.
  4. Let it sit in for 15 mins.
  5. And the final step – wear your gloves again and run it under warm water in the sink.
  6. And yay- your glass in all ready ๐Ÿ™‚

eal3

This is the snapshot of the ladies here at Stanford, in my DIY Crafts workshop working on their projects ๐Ÿ™‚ Nothing feels as good as sharing ๐Ÿ™‚ What do you think?

eal

Happy crafting and sharing!!

Rajma & Peas Pulao

This was my first experience ever with a cooking class overseas and I must admit, I was overwhelmed.

It is always so much fun to share stories and tales of your country in an international community. Here, at the International Center at Stanford, I’ve been able to try out different things and the journey has been simply amazing. I’m sharing with all of you, the joy & spirit of togetherness got by food. ๐Ÿ™‚

Here is a glimpse of the first class that I taught here. We cooked Red Kidney Beans Gravy with Peas Rice. Recipes are given below!

Happy cooking & sharing ๐Ÿ™‚

v1 v2 v3 v4

Recipe :

Red Kidney Beans

Ingredients : ( Serves 2)

Kidney Beans โ€“ 1 can or soaked overnight & boiled
Water โ€“ 1 cup
Salt โ€“ to taste
Turmeric Powder โ€“ 1/4 tsp
Oil โ€“ 2 tbsp
Onions โ€“ 2 medium, finely chopped/ blended
Ginger โ€“ 1 tsp, minced
Garlic โ€“ 1 tsp, minced
Tomatoes โ€“ 2 cups, puree
Cumin Powder โ€“ 1 tsp
Coriander Powder โ€“ 1 tsp
Chaat Masala โ€“ 1 tsp ย  ย  ย  ย  ย  ย  ย  ย  ย  ย  ย  ย  ย  ย  ย  ย  ย  ย  ย  ย  ย  ย  ย  ย  ย  ย  ย  ย  ย  ย  ย  ย  ย  ย  ย  ย  ย  ย  ย  ย  ย  ย  ย  ย  ย  ย  ย 

Chilli powder – 1 tsp
Garam Masala โ€“ 1 tsp or Rajma masala ( 2 tsp)

Method:.

  • In a medium size pan on medium heat, add in the Oil.
  • Allow it to heat up and add in the Onions & stir frequently.
  • Add in the Ginger and Garlic, mix well and cook till the onions start to brown.
  • Add in the Tomato Puree. Mix again.
  • Cook till the oil starts to seperate. Keep an eye on it and keep stirring frequently.
  • Add in Coriander Powder, Chaat Masala & Garam Masala or Rajma Masala.
  • Add in a little water to help mix in the dry spices and to prevent it from burning.
  • Cook for a couple of minutes
  • Add the kidney beans. Mix well and allow it to come to a boil again.ย Add salt as per taste.
  • Add in some of the fresh Cilantro leaves and keep some for garnishing.

Peas Rice:

Ingredients:

Basmati rice – 1 cup
Green peas (fresh or frozen)-1 cup
Coriander leaves – fistful/ finely chopped
Salt as required

For the seasoningย 
Oil – 1 1/2 tbsp ย  ย  ย  ย  ย  ย  ย 

Cumin seeds – 1 tsp (optional)
Cardamom -2
Cinnamon – 1 inch piece
Bay leaves – 2

Method:

  • Heat oil in a pan and add the ingredients mentioned under seasoning.
  • Saute for a few seconds.
  • Add peas, chopped coriander leaves. Add rice and saute until the water (if any) evaporates.
  • Add 2 cups of water, salt as per taste (approximately 2 tsp salt) and bring it to boil.
  • Cover the pan with a lid and let it cook completely.
  • Garnish with coriander leaves and enjoy ๐Ÿ™‚

DIY Minion Pen holder

Diwali cleaning going on in the house, and I found this old pen stand lying in one corner of the cupboard.

pen holder


Poor fellow had to be kept inside cos I was bored with using the same stand for over 3 years! Buying a new one was a good option, but not an interesting one! A little time spent on Google and Youtube gave me the solution! Minion pen stand! Tada!

Minion pen holder Minion pen holder


All you need are the required color foam sheets, black marker pen, glue gun and an internet connection with the minion pen holder Youtube video! And then get started!!


Quick Work Make-up Tutorial

Hey Beauties,

All of us are so caught up in the hustle and bustle of our daily routine. We all want to leave home looking beautiful and elegant but we end up not having enough time to do so. We have a solution Follow this quick,simple and easy tutorial, we can solve our life’s biggest problem.. Haha ๐Ÿ™‚

Do comment/like/ leave feedback and suggestions! Adios for now ๐Ÿ™‚